The Blog Market

  • Home
  • About
  • Resources Directory
  • Advertise With The Blog Market
  • Contact Us

Web Fonts 101 + Resources

March 25, 2015 by jennifer Leave a Comment

Remember when our go-to fonts were Times New Roman, Arial, and (if you were a cool 90’s kid) Comic Sans? Fonts have come a long, long way since then. I’m super impressed by the never-ending amount of font options we now have! While we might still be able to download fonts at the click of a button, not all desktop fonts can be used on the web. Web fonts give us the ability to use fonts that will appear on any website regardless of the viewer’s computer system.

web-fonts-tutorial

What are Web Fonts and Why Should I Use Them?

Some fonts are built into your computer (desktop fonts). These are used for documents that will be printed or graphics that will be uploaded to the internet. If you download a fancy font and try to use it in your blog posts, chances are nobody will see it except for you.

That’s where web fonts come in handy! Web fonts are store remotely online, meaning that everyone should see them correctly on a website (even if these fonts aren’t supported by their personal computers). Installing web fonts requires some coding, but usually just a line or two.

Can I Still Use my Desktop Fonts on the Web?

Sometimes! Before using a specific font in your blog coding, it’s important to make that font is “web safe”. My favorite font ever is Futura. I use it here on The Blog Market and also on my personal blog, Earl Grey. Until a few months ago, I had only really viewed my blogs on Macs. One day I logged into my work computer (Windows) only to find Times New Roman in place of my beloved Futura. Not good! I ended up purchasing Adobe Typekit, which has allowed me to use a variation of Futura as a web font. Yay!

There are still some common fonts that most people will be able to see on both Microsoft and Mac systems. To see if your favorite desktop fonts are web safe, check out CSS Font Stack.

Where Can I Find Web Fonts?

There are quite a few places out there that offer web fonts. My favorites are Google Fonts, Typekit, MyFonts, Dafont, and Font Awesome.

How Do I Use Web Fonts on my Blog?

Here are some plugins and tutorials that I’ve found really helpful in installing web fonts:

Google Fonts for WordPress (plugin)
Using Typekit for a self-hosted WordPress Site
Using Google Fonts with Squarespace
Using Typekit with Squarespace
How to Add Google Fonts to Blogger
Learn Web Fonts by Zoe Rooney

For more font resources, check out our directory of resources! Do you have any go-to web (or desktop) fonts?

Leave a Comment

How to use Hex Color Codes

February 25, 2015 by jennifer Leave a Comment

Changing colors of web elements is usually one of the very first things learned in HTML and CSS. Maybe you are like me and first discovered hex codes while trying to beautify your Neopets shop (what up ’90s kids!). Over the years, the language of code has changed a lot but the process of choosing and changing colors has remained pretty consistent.

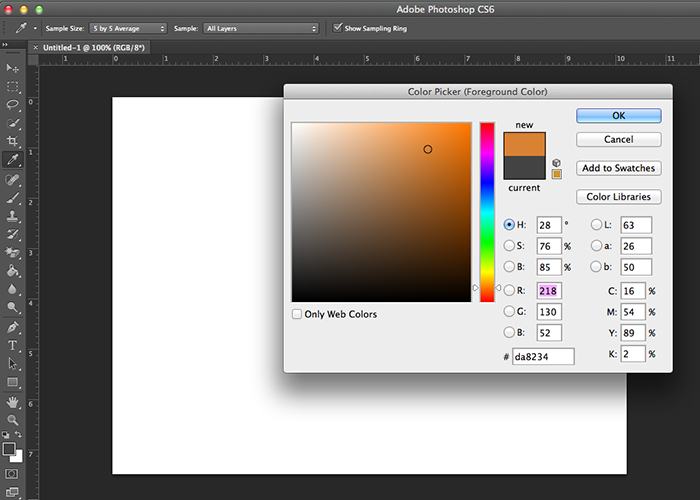
When changing colors in HTML and CSS, we use hexadecimal numbers – more commonly known as “hex color codes”. To be honest, I never think about what these color codes actually mean. I just use the color picker in Photoshop or I use the Inspect Element tool. Still, it’s neat to think about so here’s a brief rundown on how this whole color thing works.

How to use Hex Color Codes | The Blog Market

A hex code is made up of a hashtag followed by 6 digits (0-9, A-F). Together, the letters and numbers represent different combinations of red, green, and blue light (RGB). Zero represents the lack of color or light (#000000 would give you black) while the letter “F” represents the strength of a color or light (#FFFFFF would give you white). All of the numbers and letters in between “0” and “F” represent a spectrum of colors and can be combined to create beautiful custom shades. For a more extensive tutorial on how color codes technically work, click here.

When inserting colors into your CSS codes (click here for a CSS refresher), you definitely can just type the name of a common color. For example, adding “color: pink;” to your font selector would create text like this. However, I know that you probably want to be able to choose the exact hue for your test. Why not create something custom just for your blog or website? This is where some kind of color choosing tool comes in handy. For the most basic color picker, an excellent simple website is ColorPicker.com.

colors_01

Or you could just use the color picker in Photoshop!

colors_02

After you’ve chosen the perfect colors, you can copy and paste them into your CSS style sheet. Want to change your font color? Check out our tutorial on styling fonts with CSS.

For some other great ways to explore hex colors, check out our roundup of 5 color palette tools. Have fun!

Leave a Comment

CSS Basics: Margins & Padding

February 3, 2015 by jennifer Leave a Comment

Good morning and happy February!! Today I’m continuing the CSS Basics series with a little lesson on margins and padding. Spacing is a huge deal when it comes to creating a clean, user-friendly blog or web design. We already covered letter spacing and line height in the last CSS Basics post. Using the margin and padding attributes allows us to create space within and outside of larger web elements. If you need a refresher on how CSS works, check out the Intro to CSS post.

CSS Basics: Margin & Padding | The Blog Market

So, what’s the difference between the margin and padding of an element?

Margin refers to the extra space outside of an element.
Padding refers to the extra space within an element.

Here are some mockup examples of blog elements with and without margins and padding.

Example #1: Navigation Menu (Margins)

css-margins_01

Example #2: Sidebar Title with a Background Color (Padding)

CSS Basics: Margins & Padding | The Blog Market

It makes a crazy difference, huh? Okay now let’s do some coding! There are a couple of different ways to customize the margin and padding of your web elements. First, find your CSS id or class using the Inspect Element Tool. Then set up your CSS code to look something like this:

.nav-menu-item {
margin-top: 5px;
margin-right: 15px;
margin-bottom: 25px;
margin-left: 10px;
}

(Remember to replace “.nav-menu-item” with your specific element’s class)

The example above works just fine, but you can also speed up the process by including multiple properties on one line.

.nav-menu-item {
margin: 5px 15px 25px 10px;
}

The order is always clockwise so in the example above, margin-top is 5px, margin-right is 15px, margin-bottom is 25px, and margin-left is 10px.

If you’re creating a symmetrical margin setting, you can write your code in an even more simplified line such as this one:

.nav-menu-item {
margin: 5px 15px;
}

In the example above, margin-top and margin-bottom are 5px, and margin-right and margin-left are 15px.

The same exact rules apply when we’re changing the padding of an object.

These attributes are ones I consider when customizing every single element of any blog I design. I hope all of this info is clear and makes sense to you! Ask me any questions in the comments below. Hope you’re having a wonderful Tuesday!

Leave a Comment

CSS Basics: Styling Your Text

January 28, 2015 by jennifer Leave a Comment

I’m not usually one for super bold statements, but I’m gonna go all out and say that text is the most important part of a blog design. Have you ever visited a site with text that blends into the background so much that you have to tilt the screen of your laptop to read it? Not good. Having clean, readable text is key for the success of any blog. It’s also important to know how to fancy up your text a bit even if it’s just by making it bold or underlining it. This will help create a hierarchy, distinguishing your blog elements from one another (post titles, sidebar headings, etc).

css-style-text

Here are 12 CSS attributes (with examples) that will help you style the text of your blog:

1. font-size – size of text {font-size: 12px;}

2. font-family – typeface of text {font-family: helvetica, sans-serif;}

3. font-weight – heaviness of a font {font-weight: 500;}

4. font-style – style of a font {font-style: normal;}

5. text-align – alignment of text {text-align: center;}

6. text-indent – indentation of text {text-indent: 25px;}

7. text-transform – capitalization of text {text-transform: uppercase;}

8. text-decoration – decoration of text {text-decoration: underline;}

9. letter-spacing – spacing of letters {letter-spacing: 1px;}

10. line-height – line height in a paragraph {line-height: 1.5;}

11. color – change color of text {color: #000;}

12. background – change background color of text {background: #fff;}

Now that we have all of these definitions and codes, let’s see some examples of CSS in action. Suppose I want to change the body text of my blog. I would first find the class of the text (use the Inspect Element tool to find it easily) and then plug in whatever codes I wanted to style the text.

Example #1 – Styling the Body Font of a Blog

.entry-content {
font-family: Helvetica;
color: #303030;
font-size: 14px;
font-weight: 300;
letter-spacing: 1px; }

Lorem ipsum dolor sit amet, consectetur adipiscing elit. Nulla aliquam vitae libero in egestas. Sed lorem odio, luctus at luctus a, tincidunt ut elit. Morbi vitae aliquet mi, non rutrum felis. Interdum et malesuada fames ac ante ipsum primis in faucibus. Praesent ut odio lobortis, elementum magna at, molestie ipsum. Sed rhoncus sollicitudin urna a fermentum. Vestibulum ex nisi, efficitur at enim sit amet, faucibus hendrerit magna. Duis pharetra dui ac massa sodales viverra. Donec non massa eget nulla hendrerit fringilla. Class aptent taciti sociosqu ad litora torquent per conubia nostra, per inceptos himenaeos. Nullam ac dignissim leo.

Example #2 – Styling Sidebar Headings of a Blog

.widget-title {
font-family: Futura;
font-weight: 300;
text-transform: uppercase;
color: #ffffff;
background: #393939;
font-family: 16px;
letter-spacing: 2px;
width: 200px;
padding: 5px; }


sample sidebar heading


Styling your text with CSS doesn’t mean you have to go crazy with bright colors or hover effects (although they are fun).  But it’s still a great way to bring your blog design together in a way that looks intentional and professional.

As always, share any questions in the comments below and I’ll get back to you ASAP!

Leave a Comment

CSS Basics: Adding Hover Effects

January 19, 2015 by jennifer Leave a Comment

I believe that hover effects can make or break a website. They can add a touch of surprise, or they can drive your readers crazy. When used in a good way, they can make any website just a little bit more fun. I love when a header has a really subtle hover effect, like Jen’s header here. I also think it’s super important to utilize hover effects for your links. Otherwise, people might never find them in that sea of plain black text!

There are quite a few ways to use hover effects that are easy on the eyes. Let’s learn some CSS, shall we?

css-hover-effects

(If you’re brand new to CSS, it might be helpful to read this Intro to CSS post before moving forward.)

First, there are a few definitions to go over. The a selector in CSS signifies a hyperlink. It’s followed by a set of brackets with the attributes enclosed. Immediately after the a, we’re going to add :hover, which is called a pseudo class. This means that we’re styling the element in a special state (like when a cursor hovers over it). You can add :hover to any selector in CSS to change its hover effect, but today I’ll mainly be working with links and images.

1. Change Text Color

The CSS behind a regular styled link might look something like this:

a {
color:#000000;
}

To add a hover effect, you would also include this code in your stylesheet:

a:hover {
color:#ffddca;
}

hover here


2. Change Background Color

a:hover {
background:#b0994b;
}

hover here


3. Add Underline Effect

a:hover {
text-decoration:underline;
}

hover here

 
4. Change Cursor Style
a:hover {
cursor:default;
}

a:hover {
cursor:pointer;
}

a:hover {
cursor:crosshair;
}

hover here


5. Add a Border to an Element

div {
border:3px solid #393939;
}

(replace “div” with your class or id)

hover here


6. Change Image Opacity 

To add an opacity hover effect for just the single image below, I turned it into a class by adding class=”vintage-dress” to the HTML <img> tag. Then I went into my CSS editor and added the following code:

img.vintage-dress:hover {
opacity:0.5;
}

Remember that instead of using a:hover, you will use img.class-name:hover.

The Blog Market

There are so many other attributes you could use to change the hover state of any element. For more options, check out this handy CSS Cheat Sheet.

If you have any questions, feel free to ask them in the comments below!

Leave a Comment

How to Create Round Images Using CSS

December 29, 2014 by jennifer Leave a Comment

Making images round is the perfect way to add a little somethin’ to a blog design. Usually I use Photoshop, but it can also easily be done using CSS. This comes in handy if you don’t have Photoshop or if you change your mind a lot when it comes to image styles.

How to Create Round Images Using CSS | The Blog Market
If you want a completely round image, you’ll need to start with a square shaped photo.

watercolor-square
There are a couple different ways you can add your CSS codes. You can add it straight to your HTML tag which will look like this:

<img style=”border-radius:50%;” src=”http://yourimageurl.jpg”>

Another option is to add a class to your image, then add the CSS in your designated CSS editor. This is a good option if you need to edit the style of multiple elements. Here’s what that would look like:

<img class=”round-image” src=”http://yourimageurl.jpg”>

Then you would go into your CSS editor and add the following code:

.round-image {
border-radius: 50%;
}

For this tutorial, I used option #1 and added the CSS directly to my HTML image tag. Here is the result:

watercolor-square

You can also use the border-radius property to add subtle rounded edges to any image or element. Instead of border-radius:50%; you might try 10%, creating something like this:

watercolor-square
The border-radius property can be used on other elements too, not just images. It looks great when used with sidebars, date headers, and category labels. Let me know if you have any questions!

Leave a Comment

  • Newer Posts
  • 1
  • 2
  • 3
  • 4
  • Older Posts

Recent Posts

  • Easy Ways to Add Greenery to Your Workspace
  • How to use Pinterest board sections to get organized + stay inspired
  • Friday Favorites 05 | Terrazzo Trend
  • Best Creative Planners for 2020
  • 10 Journal Prompts for Creative Motivation

Recent Comments

    © 2018 The Blog Market · · BACK TO THE TOP